

Set up the categories and amenities people filter by
Build the category and amenity lists, put them on a room alongside its capacity, then watch the three of them turn into the filter panel people narrow the room list with when they book.
Three things decide how a room is found rather than how it behaves: its category, the amenities in it, and how many people it seats. Categories and amenities are lists you build once and reuse; capacity is a number on the room itself. All three arrive in the same place — the filter panel beside the room list, the moment somebody books.
1. Build the category list
A category is a resource’s one basic division — Offision describes it as the basic division for bookable resources, and that is exactly the weight it carries: a room is in one category or none, never two.
Open CategoriesOpen Categories and use Add beside the title. Two fields matter:
| Field | Worth knowing |
|---|---|
| Name | One value per enabled language. A blank one falls back to English |
| Type | Required, and the field that does the work. It ties the category to Rooms, Desks, Equipment, Parking space or Other resources, so a room’s categories are never offered on a desk |
| Type for analysis | An optional second label the analytics reports group by. Leave it alone unless you read those reports |
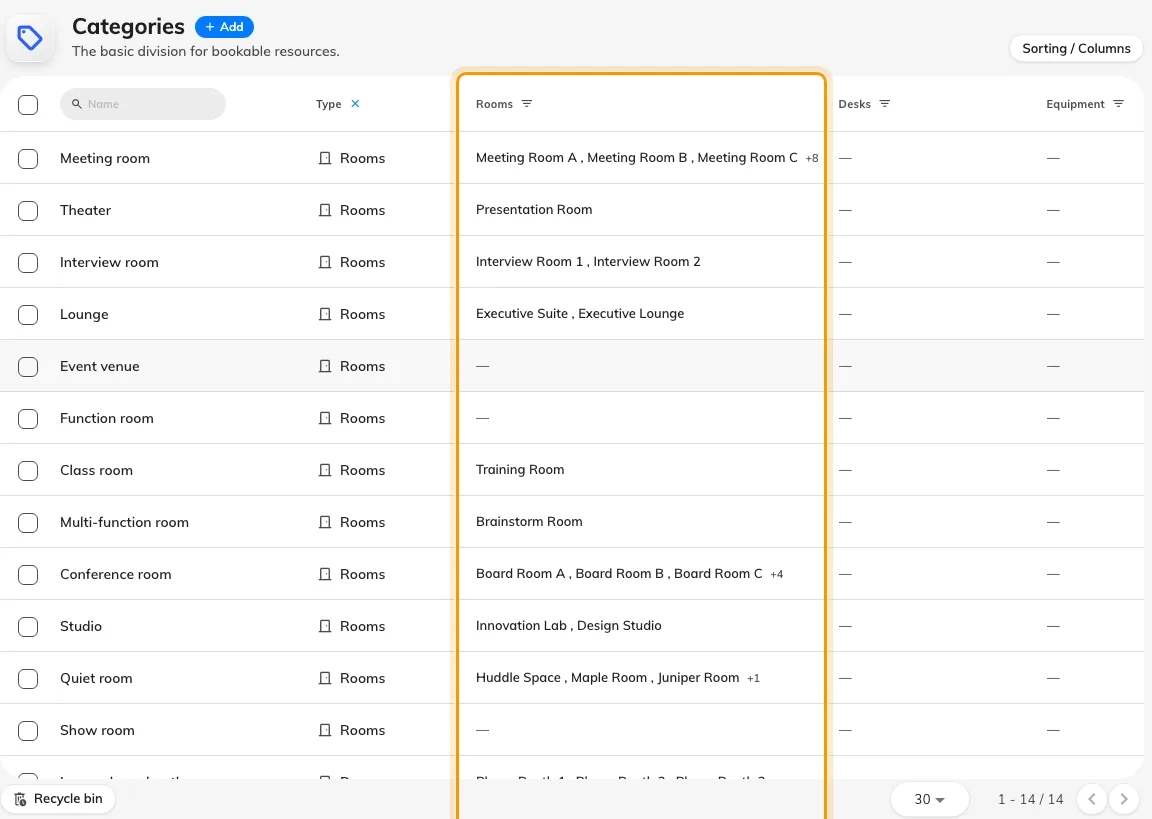
The room categories, and the rooms sitting in each.
The rail down the left of the dialog then carries one page per resource type, each with a count, where you tick the resources this category holds. A resource belongs to one category, so ticking a room here quietly takes it out of whichever category it was in before. Changes apply the moment you save.
2. Build the amenity list
An amenity is what a room has — Offision’s own words are items that are provided in the room such as Wi-Fi and a projector. Where a category is exclusive, amenities stack: one room can carry six of them.
Open AmenitiesOpen Amenities, then Add. There are only two fields, and the second one is the one people skip:
| Field | Worth knowing |
|---|---|
| Name | One value per enabled language, as above |
| Icon | Not decoration. This glyph is what the booking filter draws on the amenity’s card and what a room row shows, so an amenity with a vague icon is an amenity nobody recognises in the filter |
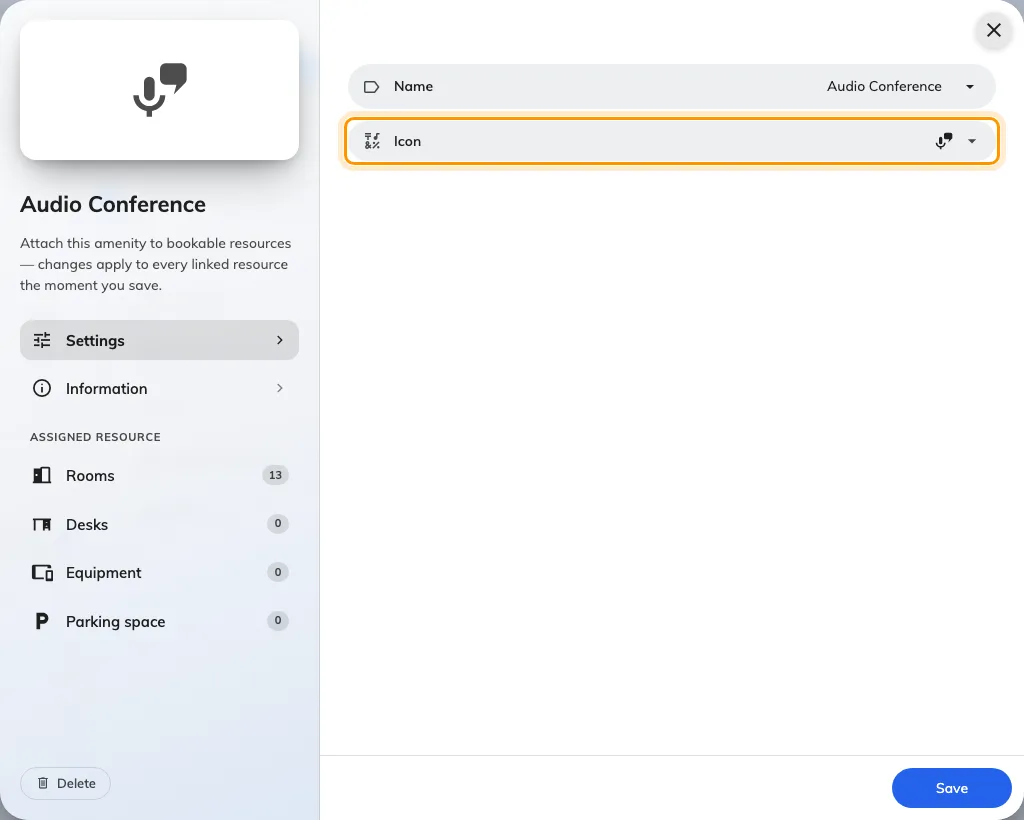
Name and icon, with the per-type assignment pages down the rail.
The rail works the same way, except an amenity can be on any number of resources and on more than one type at once — Wi-Fi is as true of a hot desk as of a board room. The dialog says it plainly: changes apply to every linked resource the moment you save.
3. Put them on a room, with its capacity
Open the room from Rooms and look at its Basic page: Category, Capacity and Amenity sit together there. That form is walked through in Add a room, so this is the one thing that article does not say:
Capacity is rooms only, and it is required. A hot desk has no capacity field at all — which is why the size filter in the next step appears for rooms and for nothing else.
Assigning from the other direction is usually faster. Twenty rooms getting the same amenity is one pass through the amenity dialog’s assignment page, not twenty visits to twenty rooms.
4. What people filter with
Everything above exists for this screen. Open the room picker in a booking form and, at a desktop width, the filter panel swings out beside the list on its own. Collapse it with the chevron at its top and a sliders More filters button appears on the list to bring it back — which is also how it works on a phone, where the panel never opens by itself.
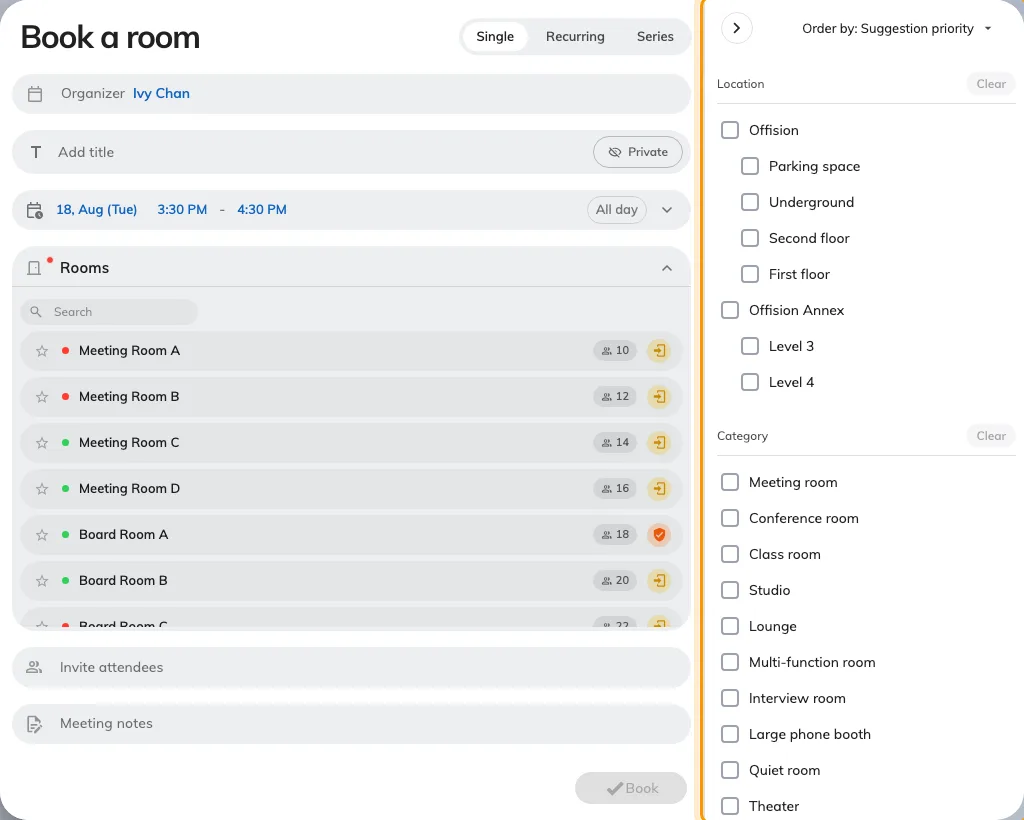
The filter panel, open beside the room list.
| Filter | How it behaves |
|---|---|
| Location | Buildings and floors, as a checkbox list |
| Category | A checkbox list, multi-select. Ticking two categories shows the rooms in either |
| Capacity | Rooms only. A grid of the sizes that actually exist — a number no room matches is greyed out and cannot be picked |
| Amenity | One card per amenity, drawn with its icon |
Capacity takes a range, not just a number. Click one square for exactly that
many seats, or drag across several for a span — hover the grid and it says so:
Click to select / Drag for range. The header then reads (6) or (4 - 8), so
you can tell which you got.
Amenity has a Match toggle in its header, and it changes the answer completely. Match All — the default — means must have all selected amenities. Match Any means have at least one selected amenity. Somebody who ticks four amenities and gets an empty list is almost always on All.
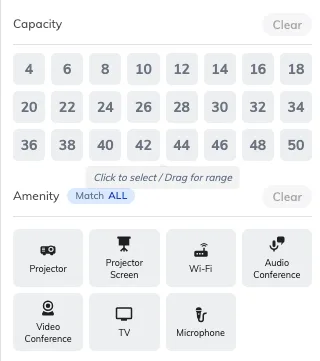
The capacity grid and the amenity cards, with Match in the header.
Two behaviours surprise people:
- Filters are remembered per resource type. Narrow rooms to eight seats, switch to Equipment, and the capacity filter does not follow you — switch back and it returns.
- Clear all filters empties this panel only. The search text, Available only and Favourites only live outside it and stay exactly as they were.
Capacity turns up once more without being a filter: select rooms whose seats
total less than the number of attendees and a 12 / 8 people badge appears on
the resource row, reading The number of attendees exceeds the room capacity.
It is a warning. The booking still saves.
In the user app the same panel appears without Category — there, category is picked from the room list’s Type menu instead, where each resource type expands into its categories with a count beside each.
Check it worked
Open a booking form, expand the room picker so the filter panel appears, and tick one category and two amenities. The list should narrow to the rooms you assigned in steps 1 and 2. Now switch Match from All to Any and confirm the list widens — if nothing changes, no room carries both amenities yet.
What this does not cover
- Who may book a room. A category groups rooms; it never restricts anyone. That is a team space — see Give a department its own rooms.
- Whether a room appears at all. That is the Booking settings toggle on the resource, in Add a room.
- Refusing an oversized booking. Capacity warns and nothing more. To stop a booking outright you need a rule, in Booking rules reference.
- The room panel outside the door. Its Other rooms list prints capacity and amenity icons so you can judge a row, but it has no capacity or amenity filter — see Find another room from the panel.
- Floor-plan facilities. Toilets, pantries and the rest are a separate list drawn on the map; they are not amenities and never reach this filter.