

Ask for a cost item and project ID on every booking
Build a booking form that asks the questions your organisation actually needs answered, then read the answers back — as columns in the booking export, and as the hours charged to each code in the usage report. About twenty minutes.
The booking form is yours to compose. Alongside the built-in fields — subject, attendees, host — you can add fields of your own, so the form asks what your organisation actually needs to know before a space is taken. This article builds the finance case, a cost item and a project ID on every room booking, but the same seven steps build a safety briefing, a class code or a sample reference.
1. Put your cost codes in a data set
A cost item is not free text — it is a code from a list finance already maintains. Build that list once as a data set, and every form can reuse it.
Open Data setAdd a data set, name it for what it holds, then add a row per code. Each row is a pair: Key is the code your finance system reconciles on, Display text is what the person booking reads. Keep both — the key is what gets stored beside the answer, so renaming a cost centre later changes what people see without rewriting what was already booked.
For a real chart of accounts use Import from Excel rather than typing rows.
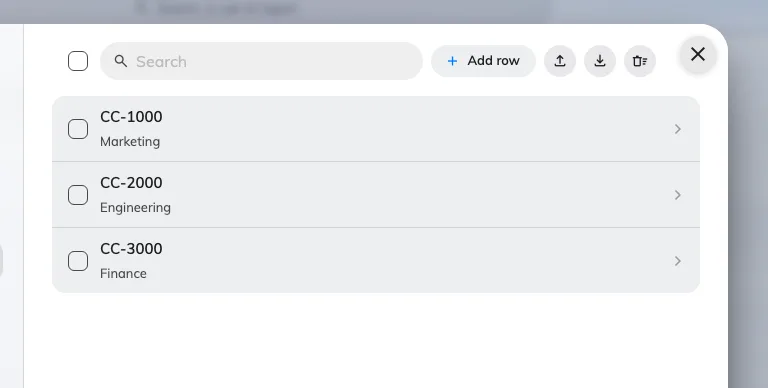
A data set of cost codes: the key, with what people see underneath it.
A data set is worth the extra step over a plain Select field whenever the list is long, shared between forms, or maintained by somebody other than you. For five fixed options, a Select field is simpler and there is nothing wrong with it.
2. Create the booking form
Open Booking formChoose Add. Name the form after the group of resources it will serve — Chargeable rooms, Labs, Company cars — not after the fields on it. You will assign resources to it by name in step 6, and a form called Cost item form stops making sense the moment you add a second question to it.

The booking forms you already have, with Add beside the title.
Leave Default display form off unless this is the form you want people to see before they have picked a resource. Only one form can hold that role.
3. Add the cost item field
The form editor opens on a single list holding both the built-in fields and your own, in the order they will appear. Drag to reorder; choose Add field to add one of yours.
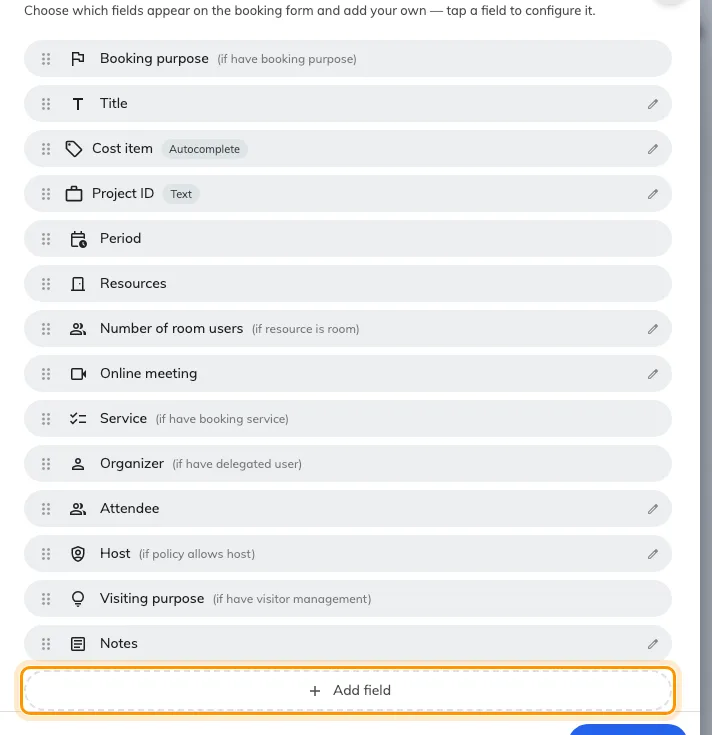
The form's fields in display order, with Add field underneath.
Fill in the new field:
- Name — what the person booking sees. Give it a name in each language your tenant uses; a field named only in English shows up in English on a Japanese screen.
- Description — the one-line hint under the field. Use it for the rule people get wrong: “Use the code for the team being charged, not your own.”
- Field type — Autocomplete, then choose the Data set from step 1.
- Required — on, so a booking cannot be saved without it.
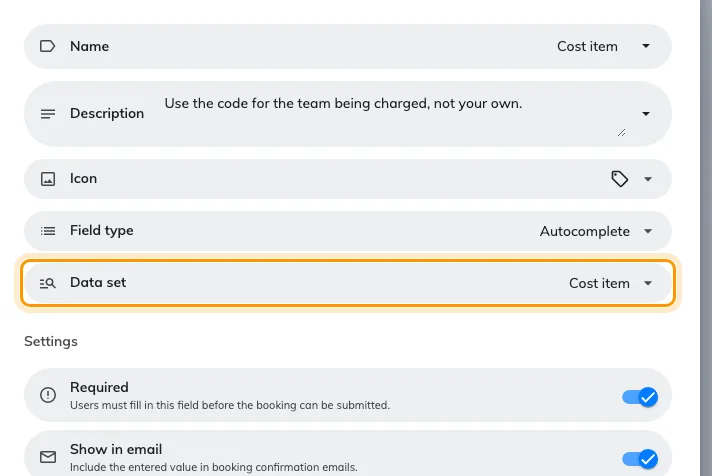
The cost item field, reading its options from the data set.
4. Add the project ID field
Add a second field the same way, with Field type set to Text.
Reach for Number only if the identifier really is a number. A project ID like
PRJ-0042 is not: a number field drops the prefix and the leading zeros, and the
value that reaches your export no longer matches the one in your project system.
5. Decide who sees the answer
Every field carries its own audience, in the settings underneath it. This is where a cost item differs from a meeting subject — finance needs it, the person walking past the room does not.
- Required — the booking cannot be saved without an answer.
- Show in email — the answer appears in booking confirmation emails.
- Show in User Portal (Resource schedule) — colleagues looking at the room’s schedule can see it. Leave this off for anything commercially sensitive.
- Show for service staff and Show for service manager — the answer reaches the people fulfilling catering or equipment requests.
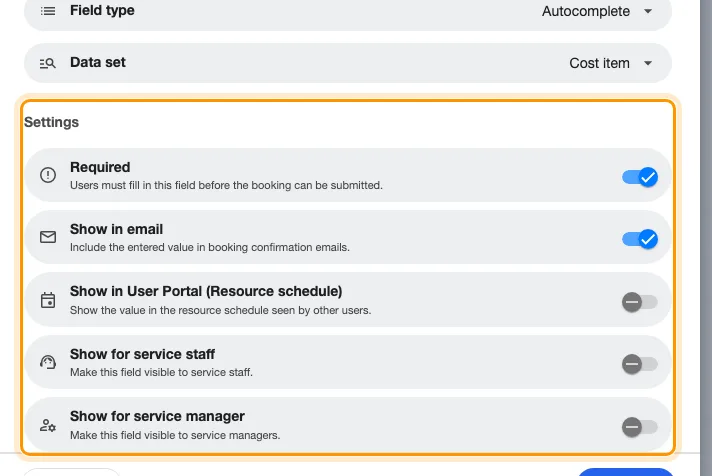
The audience switches on a single field.
Whatever you choose here, the answer always reaches the booking’s own detail, the approval screen, and the booking export.
6. Apply the form to your rooms
A form does nothing until resources use it. The editor’s left rail carries one page per resource type under Assigned resource, each with a count of what is already assigned. Open Rooms, select the rooms this form should apply to, and save.
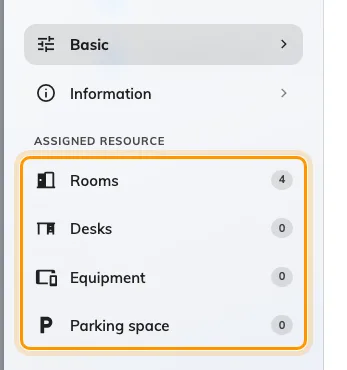
The editor's pages, with the assigned-resource counts.
This is the step people miss. A form with no resources assigned to it is never shown to anyone, and nothing warns you.
7. Ask different questions for a different purpose
Optional, and only where the reason for a booking matters more than the space: a booking purpose can carry Override booking form and replace the whole set of extra fields while that purpose is selected. Useful for External interview or Client event, where the room is ordinary but the paperwork is not.
Before using it, read which form a booking uses — an override with no form chosen removes every extra field rather than falling back.
8. Check it worked
Book one of those rooms yourself, as an ordinary user. Both fields should appear once the room is selected, the cost item should offer your codes as you type, and the booking should refuse to save while either is empty.
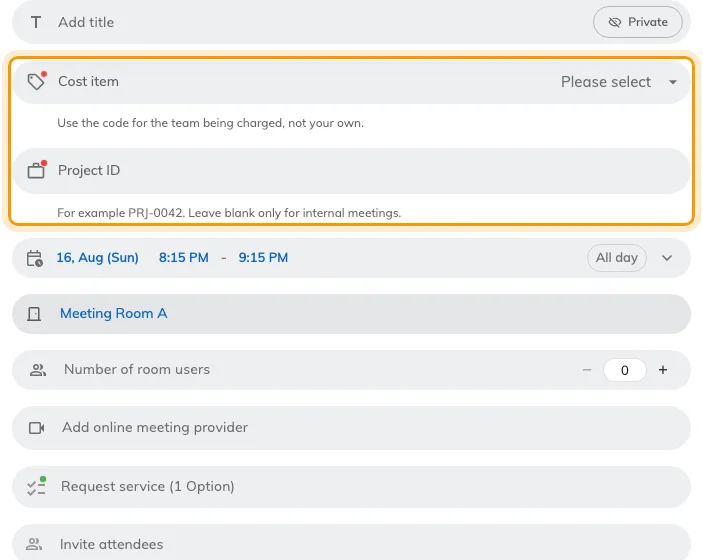
The two fields on a real booking, once a room has been chosen.
Then export the booking report for that room. Each field arrives as its own column, one row per booking — which is the whole point, and the thing to confirm before you tell finance the data is there.
If the fields do not appear, the room is almost certainly on a different form, or on none. Open the room and check which booking form it uses.
9. See what each cost item used
The answers are not only an export column. Every booking-form field that can be pivoted on — select, yes/no, text, phone, number and autocomplete — is offered as a dimension in the User resource usage report, under a Booking form group. That is the second reason step 3 chose Autocomplete: a free-text cost item would arrive as a hundred spellings of eight codes.
Open User resource usageDrag your cost item field onto Rows, and put Month or Department across the top. Each cell is that code’s bookings and hours for the period.
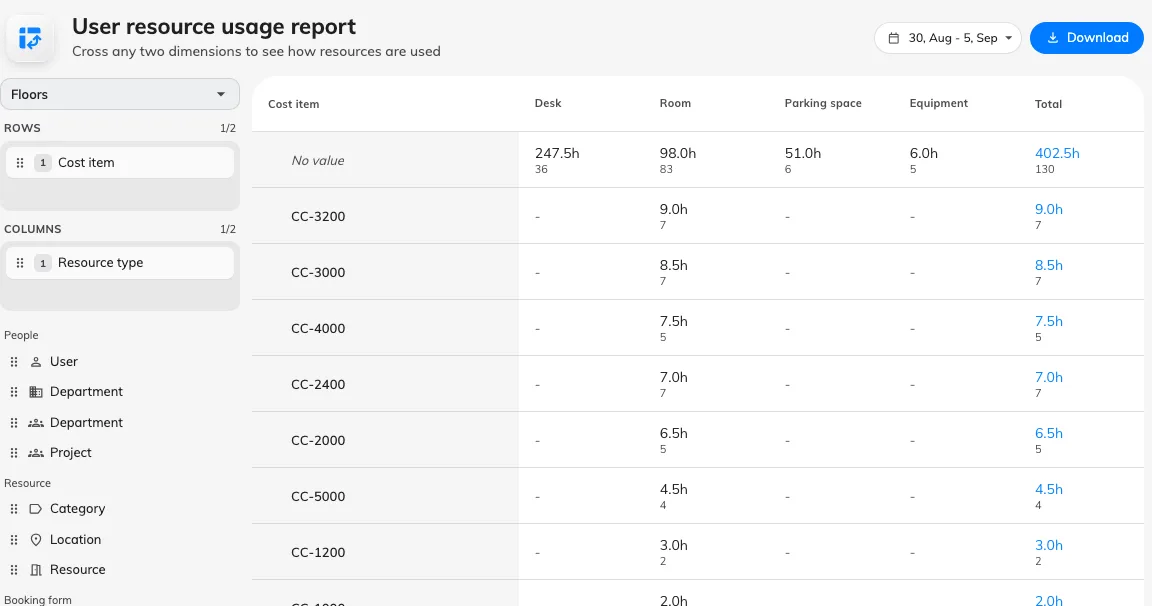
Every cost code, and the hours charged to it.
Two things to expect the first time:
- A
No valuerow. It holds every booking that was never asked the question — made before you added the field, or made on a room that uses a different form. It is the honest measure of how much of the estate is still uncharged, and it shrinks as step 6 reaches more rooms. - The key, not the display text. A row is labelled with what the booking stored, which is the Key from step 1 — the code your finance system reconciles on.
For finance, Download rather than reading it on screen: the workbook’s Raw data sheet is one flat row per combination, which is the shape to drop into a spreadsheet of your own. What the numbers count, and what they deliberately do not, is set out in See how much your rooms are used.