

Choose where a resource can be booked from
Three toggles decide which surfaces may create a booking — the admin console, the User Portal and the panels — and the three arrangements people ask for: bookable only from the app, only by scanning the sticker, and not from the portal at all.
Every booking is created from one of three places: the admin console, the User Portal, or a panel on a wall. The policy decides which of the three a resource will accept, and it is the answer to a family of questions that sound different and are the same one — make this desk bookable only from the app, let people take it only by scanning the code on it, stop anyone booking it in the portal.
1. Open the policy those resources use
Open Booking policySelect the policy and choose Edit in the panel that opens on the right, then choose Create/Edit booking channel from the list of pages down the left — the seventh one. Three toggles, all on when a policy is new.
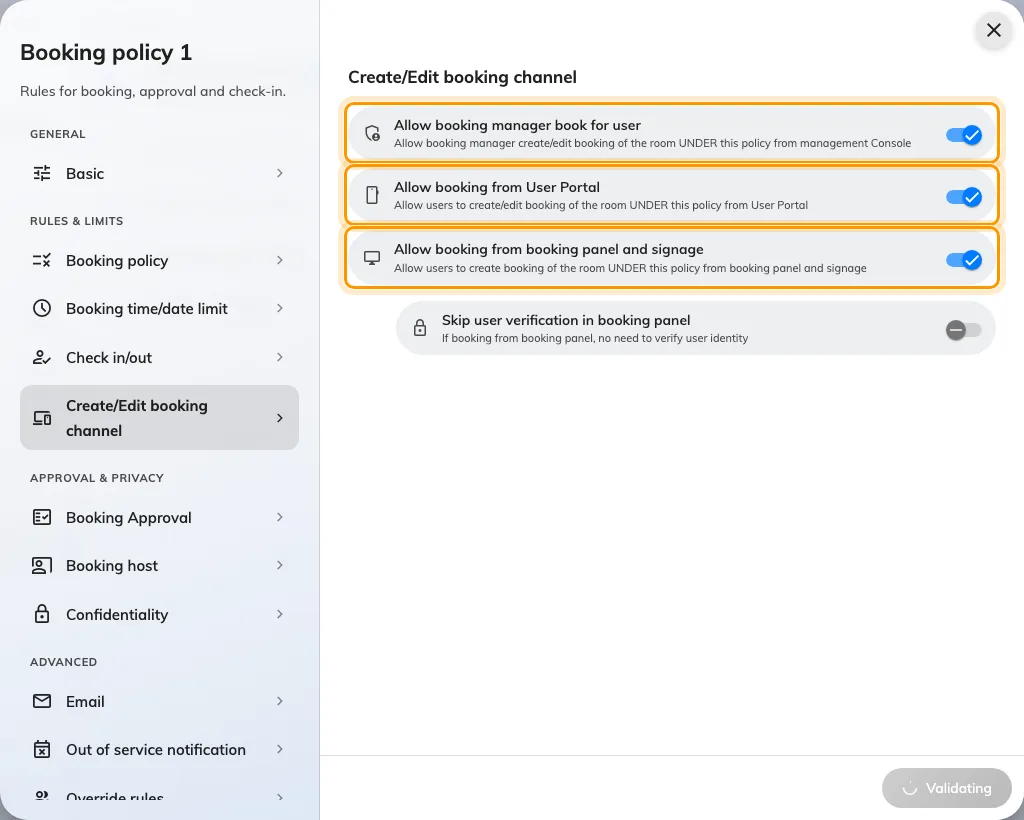
Create/Edit booking channel. Three toggles, one per surface, all on to begin with.
2. Which surfaces each toggle covers
This is the step worth reading slowly, because two of the three cover more than their names suggest.
| Toggle | What it covers |
|---|---|
| Allow booking manager book for user | The admin console, and only the admin console |
| Allow booking from User Portal | The web app, the mobile app, Teams, Outlook — and a sticker scan. One channel, not five |
| Allow booking from booking panel and signage | Room panels, desk panels and check-in kiosks. Shown where panel hardware is enabled |
Two things follow from that middle row, and both catch people out:
- There is no mobile-only channel. The mobile app is a shell around the same pages the browser shows, so a policy cannot let a phone book a desk and refuse a laptop. If you need to vary who may book from where, vary it by person — an override rule on this policy reopens a channel for named users or user groups.
- The printed sticker rides on the User Portal. Scanning a desk opens the portal on the phone, so scan-to-book is the same channel as booking from the app. Turning Allow booking from User Portal off stops the sticker booking anything.
Off does not mean the same thing on every row. Switch off the admin console or the User Portal and the resource stops appearing on that surface — it is absent from the list rather than greyed out. Switch off the panel and the resource is still on the panel’s screen; the refusal comes when somebody tries.
3. Bookable only from the app
Turn Allow booking manager book for user and Allow booking from booking panel and signage off, and leave Allow booking from User Portal on.
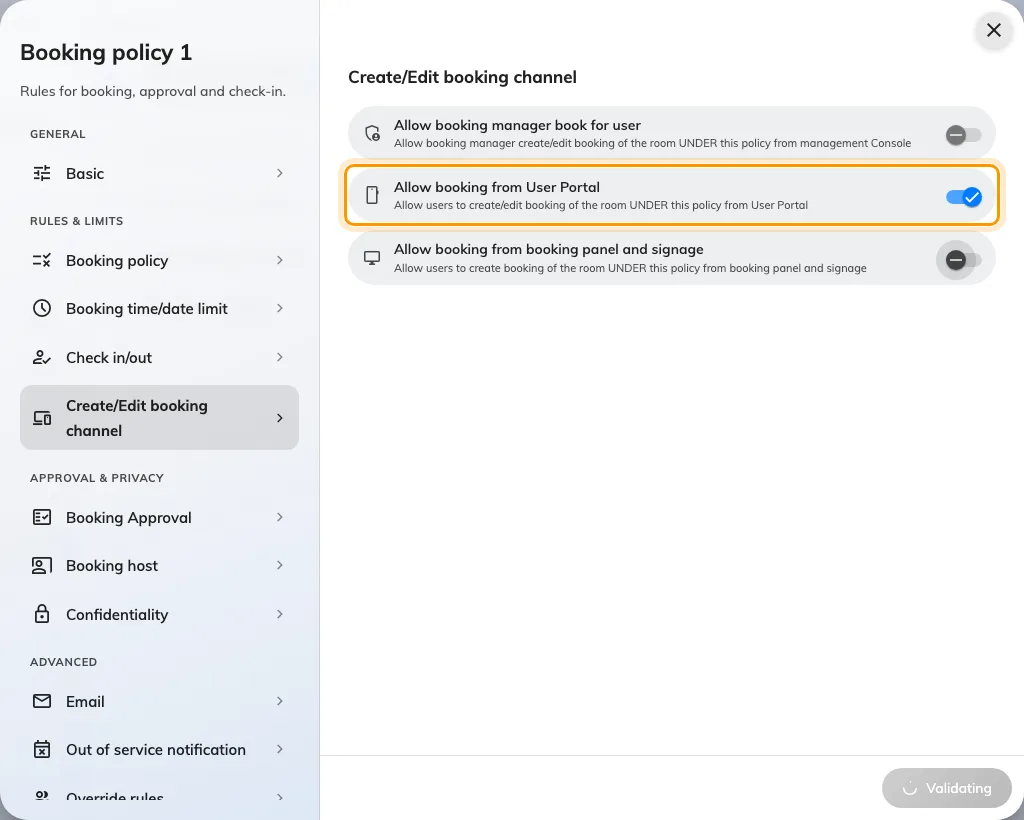
App only: the User Portal left on, the other two off.
What this gets you is self-service only — nobody can book it on somebody’s behalf from the console, and nobody can claim it at a panel. What it cannot give you is phone only, for the reason in step 2: a browser on a laptop is the same channel as the app on a phone.
A booking manager who tries anyway is told Not allow booking from management Console — the message names the channel that refused, which is how you tell this apart from a resource somebody simply cannot see.
4. Bookable only on the spot, by scanning the sticker
There is no require QR switch. What produces this is a combination, and the piece that does the work is on a different page.
Go back to Booking policy — the second page — and turn on Walk-in Only: “This resource can only be booked in (walk-in). Advance booking is not available.” The resource now refuses any booking made ahead of time, and drops out of the booking form.
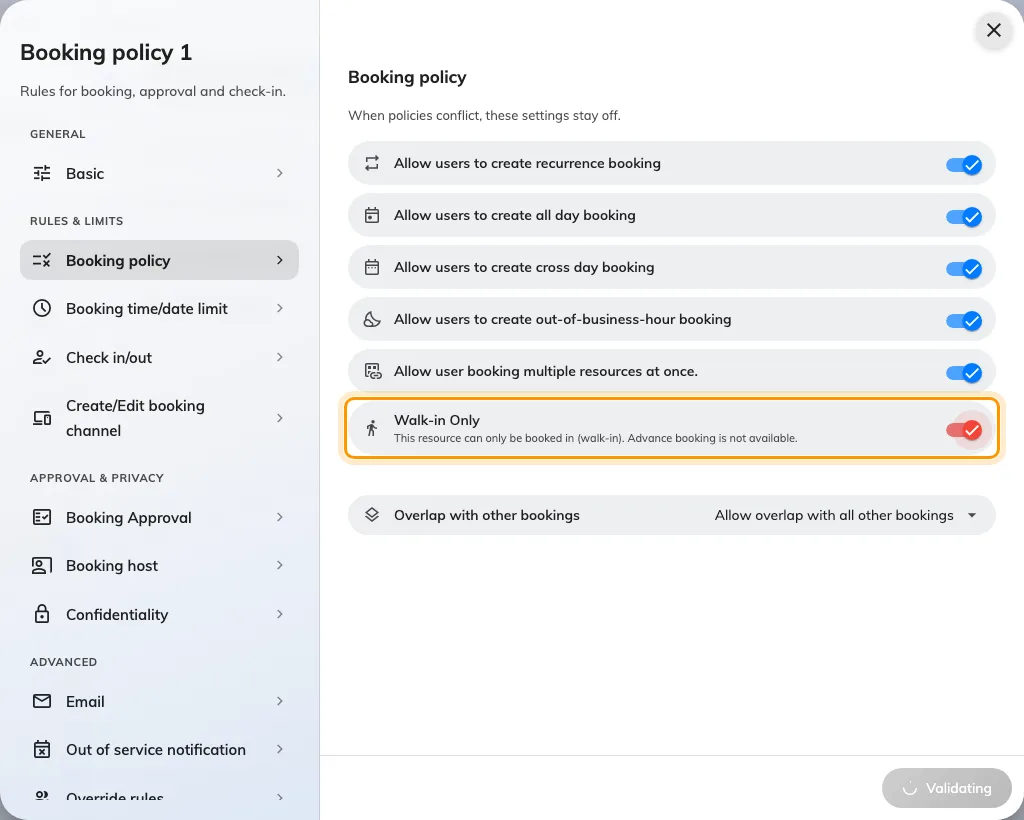
Walk-in Only, on the Booking policy page rather than the channel page.
Then, on Create/Edit booking channel:
- Leave Allow booking from User Portal on. The sticker needs it. This is the toggle people reach for when they read “only by QR”, and it is the one that breaks it.
- Turn Allow booking from booking panel and signage off. Walk-in Only means on the spot, not by scanning — a panel is on the spot too. Switching it off is what leaves the sticker as the only remaining way in.
Finally, on Others, set User Portal check-in IP restriction to your office addresses. A printed code never changes, so anybody who photographs one can scan it from home, and a desk booked from a sofa is worse than no booking at all.
Walk-in Only also does not hide the resource everywhere. It disappears from the booking form, but stays on the resource calendar carrying a Walk-in only badge and refusing to be dragged — someone who sees it there has not found a setting that failed.
5. Not bookable from the portal
“Portal” means two different screens to two different readers, so decide which one you mean before switching anything off.
- The admin console — turn off Allow booking manager book for user. The resource stops appearing on the console’s booking form, and a manager can no longer create or edit one of its bookings for somebody else. People carry on booking it themselves in the app.
- The user-facing portal — turn off Allow booking from User Portal. The resource vanishes from the app’s resource list, and an attempt that gets that far is answered with Not allow book from APP. The same refusal is worded Not allow booking from User Portal on the admin console, which is the same channel described from the other side.
6. Attach the policy to the resources
The policy changes nothing until a resource points at it. Open each resource’s Policy page and choose it, or assign a batch from the policy’s own resource pages.
This is where these three arrangements usually go wrong: a policy is shared, so switching a channel off here switches it off for every resource under it. One desk that has to behave differently from the floor around it needs a policy of its own.
7. Check it worked
Prove the refusal, not the success — a resource that still books tells you nothing about which toggle is doing it.
- App only — sign in as an ordinary account and book it. Then open the same resource on the admin console’s booking form: it should not be in the list.
- Scanning only — the desk should be missing from the booking form entirely, and scanning its sticker should still offer to book it. If the form still offers it, Walk-in Only is off or the policy is not attached.
- Off in the portal — the resource should be absent from an ordinary account’s resource list. Then scan its sticker, and expect that to refuse as well; if you needed the scan to keep working, go back to step 4.
What this does not control
- Who may book it at all. That is team space, set on the resource — a channel toggle decides from where, never by whom. See Give a department its own rooms.
- Whether the booking is shaped legally — the window, the duration, all-day, recurrence, business hours. Those are the rest of the policy: Booking rules reference.
- Check-in. A scan that checks somebody into a booking they already have is not a booking, and none of these toggles touch it. See How check-in and no-show work.
- The sticker itself — printing it, placing it and reissuing a code that has been photographed: Print and put up resource stickers.
- A booking purpose that overrides the policy. A purpose can carry its own policy, and an override left empty means no policy rather than this one.