

Connect a label printer to a signage screen
Attach a Brother QL label printer to the screen at reception so it prints a visitor badge on every walk-in, check-in and QR registration — from the screen's own device menu, no computer involved.
A signage screen at reception can hand every visitor a printed badge without anyone standing behind a desk. The moment someone walks in at the screen, checks in, or finishes registering from the screen’s QR code on their own phone, the screen sends a badge label to a printer sitting under it. The whole connection is made on the screen itself, from its device menu — no computer, and no drivers.
The printer to buy is a Brother QL-820 — a small label printer that takes 62 mm DK label rolls, in plain black or black & red, and joins the network over Wi-Fi or pairs over Bluetooth. The QL-810 works the same way, and on an iPad any AirPrint printer on the network is an alternative. The screen finds the printer, reads which roll is loaded, and sizes the badge to it on its own.
An iPad is not the only screen that can do this. Any screen running the Offision player app prints the same way — an Android signage panel such as a Qbic or IAdea panel, a Neat board, or a Windows or macOS computer. The differences are small: AirPrint is an iPad-only alternative, a Neat board has no Bluetooth so its printer must be on the network, and on a computer the same settings open in a window titled Label printing. The full list is in Which devices can print to a label printer.
1. Open the screen’s device menu
Everything in this step happens at the screen, not in the console.
Pull from the left edge of the screen — a slim rail slides out; the screen hints Pull for settings when it first starts. Tap the cog on the rail. The screen asks you to prove you are staff: Enter passcode on the keypad, or a player manager can scan the QR code or tap their card instead.
The Device menu opens. Choose Printer settings.
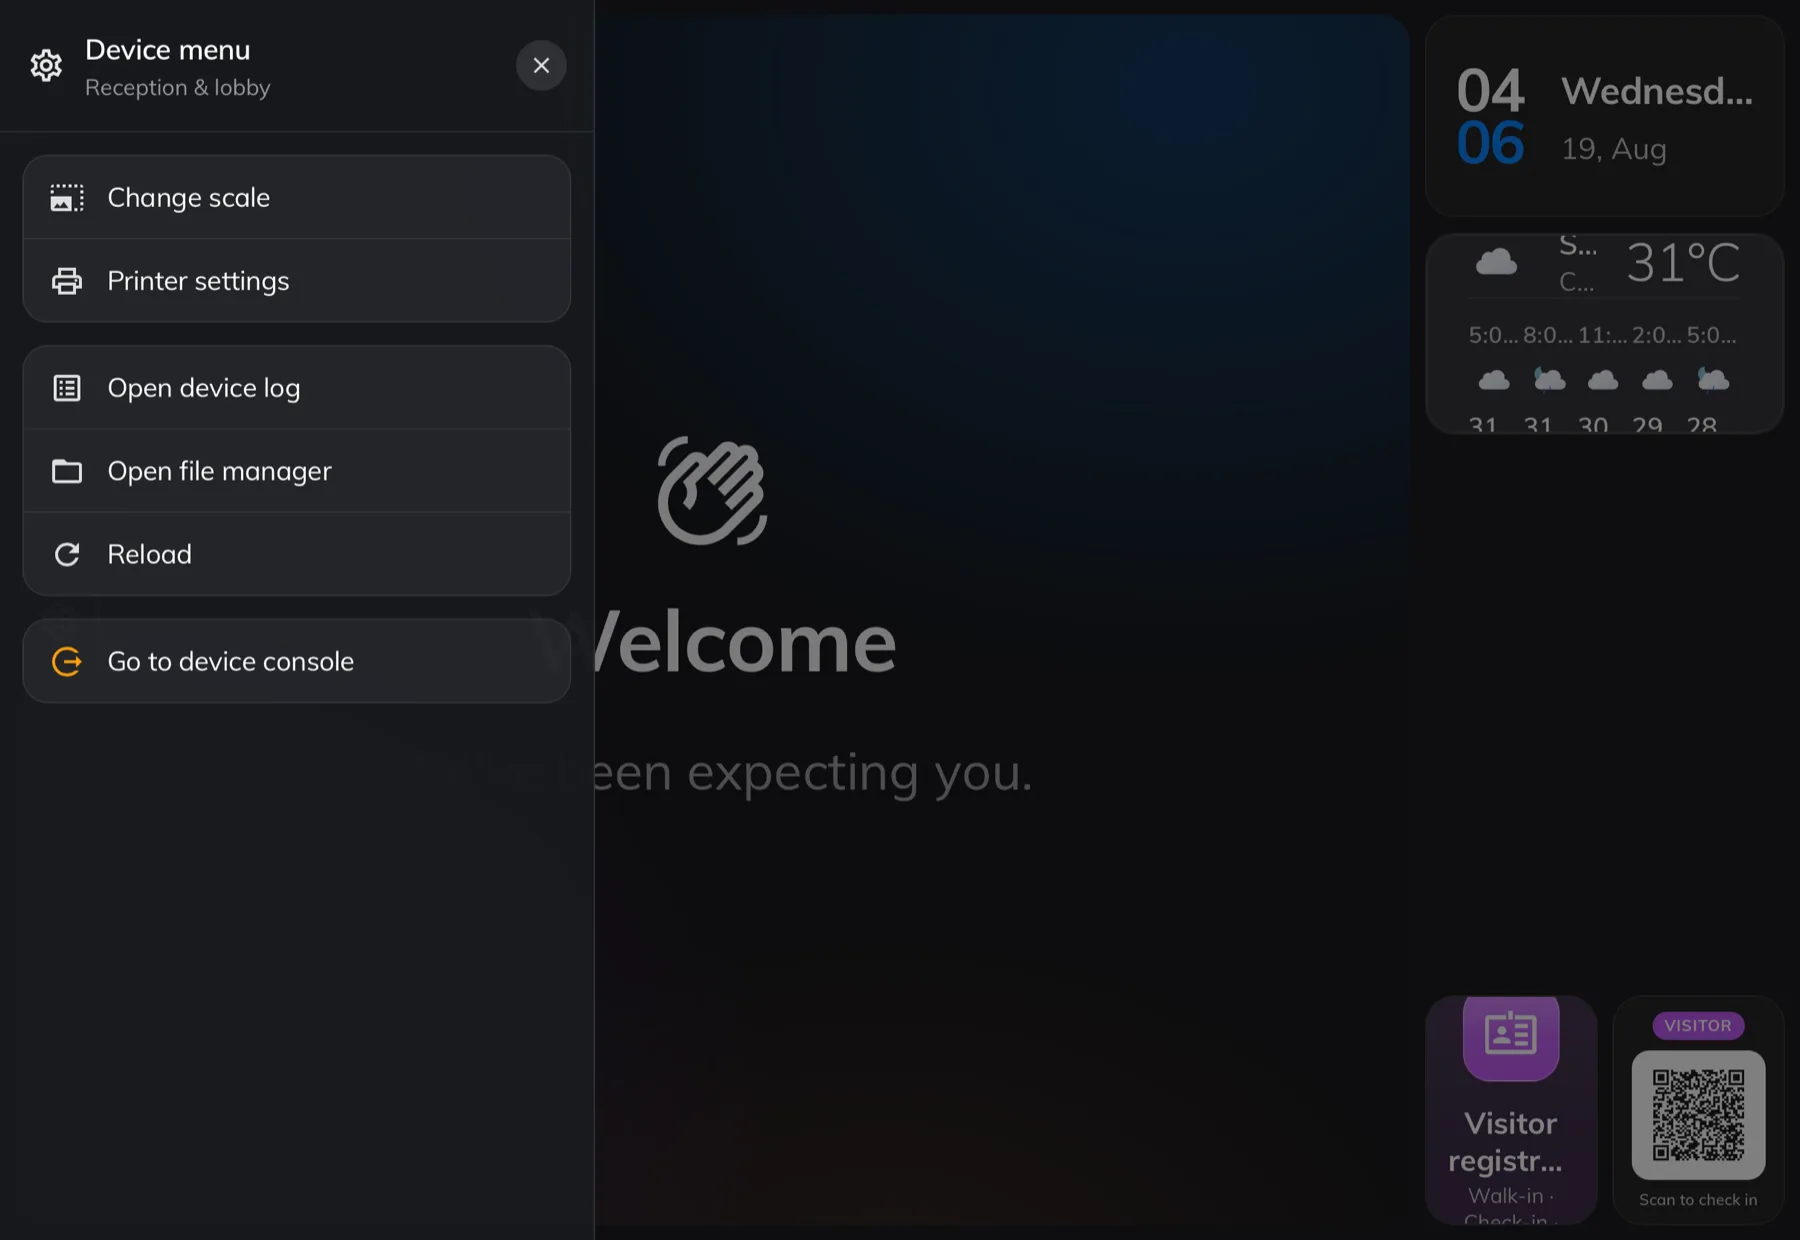
The device menu, pulled out from the left edge — Printer settings is the row with the printer icon.
Printer settings only appears when the screen is running the Offision player app. The same content opened in an ordinary browser has no printer to talk to, so the row is not there.
2. Connect the printer
Leave Brand on Brother. On an iPad, AirPrint is the other choice — pick it only if your printer is not a Brother QL, and choose the printer from the system list it opens.
Under Connection, Auto looks everywhere; switch to LAN / Wi-Fi or Bluetooth if you want to search one way only. Then let the scan run — the printer appears in Printers by name. If the scan cannot find it, tap Add by IP and type the printer’s address — Printer IP, e.g. 192.168.0.90 — which you can read from the printer’s own network settings printout.
Tap the printer to select it. Label paper fills in on its own with the roll the printer is carrying — its width, and whether it prints black only or black & red. There is nothing to choose here; swap the roll and tap it again to re-read. Print quality trades speed for sharpness and is fine left on Normal.
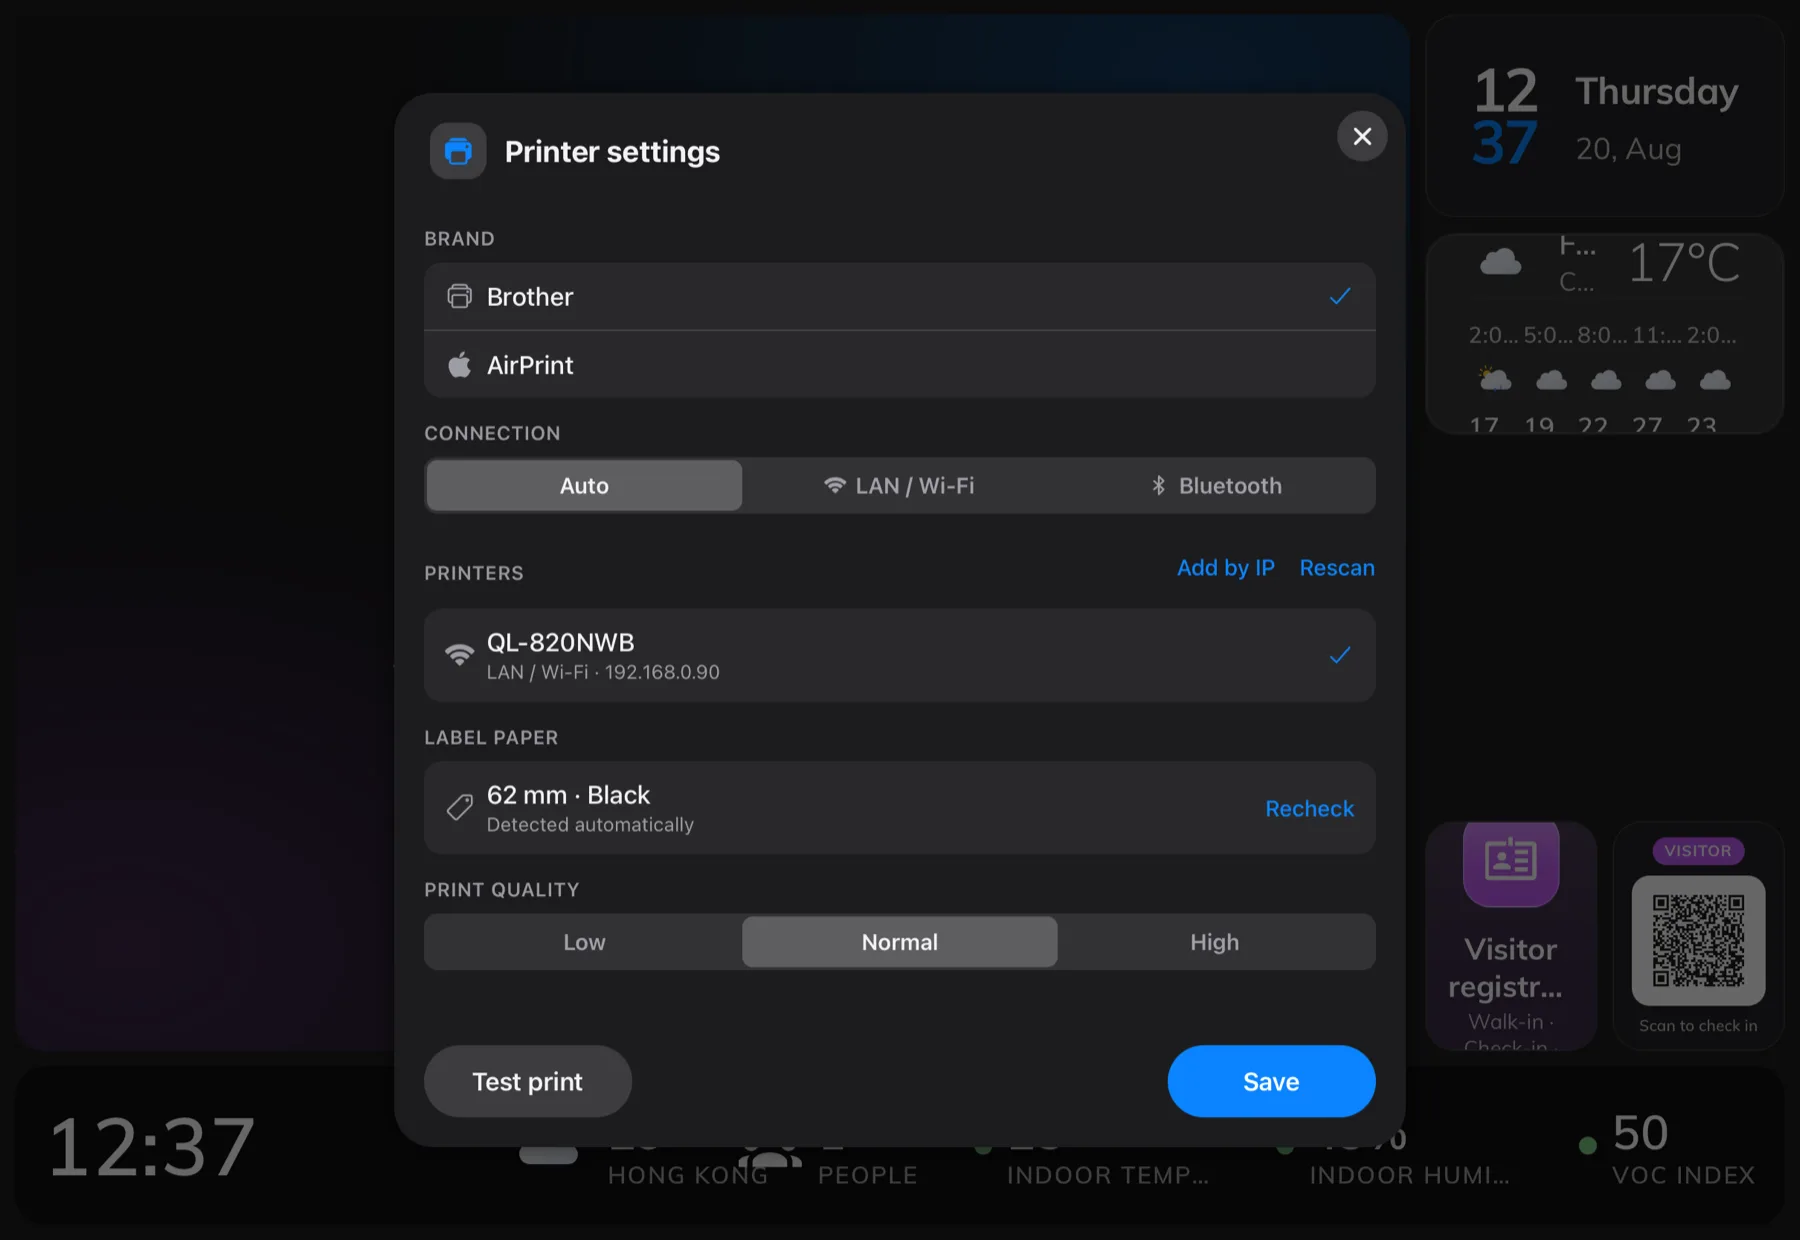
Printer settings on the board — the QL-820 found on the network, with the loaded label roll read from the printer.
3. Test print and save
Tap Test print. A test label should come out of the printer within a few seconds — if it does, the connection is real, not just a name in a list. Then Save. The screen remembers the printer from now on, through restarts and power cuts, and reconnects to it by itself.
4. Check the board is allowed to print
Printing is switched per widget on the content, and it is on out of the box — this step is a check, not a change, unless someone turned it off.
Open the content in Signage › Content, and in the live preview click the Visitor registration QR code tile. Its settings open on the right, and near the bottom sits Print visitor badge label: when on, this board prints the visitor badge label after a visitor completes registration from this QR code. The Visitor self service buttons widget carries the same switch for walk-ins and check-ins made at the screen itself.
Open Signage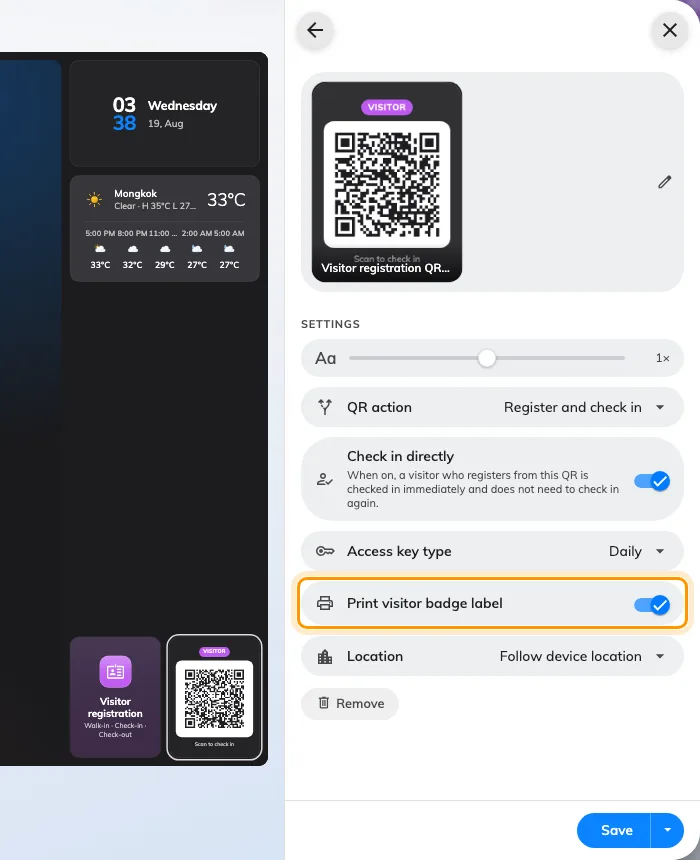
Print visitor badge label, on the QR code widget's settings in the content editor.
5. Check it worked
Walk the visitor’s path yourself: register through the QR code on the screen, or tap through a walk-in at the screen. The screen shows Printing your badge, and the label comes out below the screen. If you registered from your phone, the badge prints at the screen while your phone tells you where to collect it.
Back in Printer settings, the Print tasks list keeps every label the screen has printed, with a preview — the place to reprint one, and the first place to look when someone says their badge never came out.
What this does not control
What the badge says and how it looks — logo, name, host, validity — is the company-wide badge design, set in the visiting settings, not on the screen. See Change the visitor badge design.
Which visitors the screen serves is decided by the player’s location — that is Set up a lobby screen for visitors.
A receptionist printing badges from the console on a PC connects a printer to that computer separately — see Connect a badge printer to your reception desk. The screen’s printer and the reception PC’s printer know nothing of each other.