

What appears on a visitor badge
A printed badge is assembled from four different screens, and only one of them is the design you picked. This explains which part comes from where — and what the photo taken at check-in is for: printed on the badge, kept on the visit, never compared at the gate.
A visitor badge is the label printed at reception when a guest arrives, and attached to the badge email they were sent beforehand. It identifies the guest to your staff and, on most designs, carries the code they check in with.
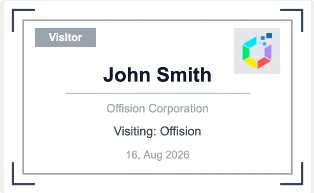
A badge: the visitor role (1), their name (2), their company (3), your logo (4).
Designs differ in what else they carry. Several print the QR code the visitor scans at the lobby; one puts a photo and the guest Wi-Fi credentials on the same label.
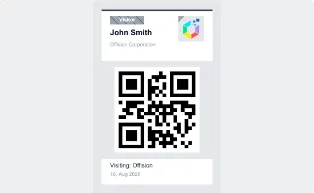
Another design, carrying the QR code the visitor scans at the lobby.
So the badge looks like one thing, and people reasonably assume it is configured in one place. It is not. Four screens each contribute a part of it, which is why changing the design does not always change what someone is complaining about.
The four sources
| The part | Comes from | Scope |
|---|---|---|
| The layout — where the name, photo and code sit | Visitor label design, on the visiting settings page | One design for the whole company |
| Name, company, photo, visitor code | The visit itself, and what the visiting type asked the visitor for | Per visit |
| Whether the QR code and the visitor code are printed at all | The visiting policy attached to the location | Per location |
| The Wi-Fi network and password block | Visitor WiFi | Per building, or company-wide |
The photo is printed, not checked
Where the visiting type asks for a photo, reception takes it at check-in (or the visitor supplies one when they register), it is stored on that visit’s record, and the designs with a photo slot print it on the badge. That is the whole of what the photo does. It is there so a person at a door can look from the badge to the face; nothing in Offision compares it to anything. Scanning a badge checks that the code is valid, unused and at the right location — a code passed to somebody else scans just the same, and the photo on the label is what a receptionist or guard uses to notice.
The design is company-wide
There is one badge design, and every visitor gets it — every location, every visiting type, every building. A visiting type decides what the visitor is asked for and when they may check in; it does not carry a design of its own.
The design is chosen from a fixed gallery. Each entry is a complete layout, not a starting point: there is no field-by-field editor, no colour picker, and no page where you rearrange what sits where. Choosing a different design is the only way to change the arrangement.
The design adapts to what it is given
The designs are drawn at print time from whatever that visit actually has, so the same design produces different badges for different visitors. The photo and Wi-Fi design is the clearest case: it drops the photo when the visitor never supplied one, drops the credential block when there is no visitor Wi-Fi configured, and prints a plain badge when it has neither. Nothing warns you — the badge simply comes out simpler than the preview.
This is worth knowing before judging a design by one printed sample. A badge that “lost” its photo is usually a visit without a photo, not a broken design. Where that photo comes from, and why it verifies nothing on its own, is The visitor photo.
It applies to the printed label only
The design covers the badge that is printed at reception and attached to the badge email. Two other things a visitor may be holding look different by construction:
- The badge page on the visitor’s phone — the web page a visitor opens from their invitation. It has its own fixed layout and ignores the design.
- The Apple or Google wallet pass — its artwork is set separately, on the Apple pass / Google pass settings page. See The Apple and Google wallet pass.
So a visitor arriving with a phone in their hand is not looking at the design you chose, and a mismatch between their screen and the printed label is expected.
What the location policy can remove
Two options on the visiting policy attached to a location override the design’s own idea of what to print:
- Hide QR code on visitor badge — for buildings whose own gates issue a QR code. The badge prints without one, and visitors check in at reception using the visitor code instead.
- Show external badge code — when off, the visitor code is removed from the badge email, the badge image, the mobile pass and the visitor’s badge page, leaving only the QR code. It only applies where Require external badge code is on — an Offision-generated code is the check-in credential itself and always shows — and every location on the visit must be covered by a policy that hides it. See Show or hide the visitor code.
Between them, these two settings can strip a badge down to a name and a photo without anyone touching the design — though never below one credential: a badge always keeps its QR code or its visitor code.