

Show your own QR code on a screen
Put a scannable code on a floor display — a link the screen draws as a code, or a code picture you upload — including where the cards and buttons that hold it come from.
A code on a screen is one of two different things, and picking the wrong one is the usual reason this takes an afternoon instead of five minutes.
If you have a link — a feedback form, a lunch menu, a survey — the screen can draw the code for you, and it will be sharp at any size. If somebody handed you a picture of a code already, the screen shows that picture as it is.
1. Decide which kind of code you have
This decides both the widget and where on the screen it may sit.
| You have | Use | It can sit on |
|---|---|---|
| A link, or any text | QR Code | Action buttons |
| A code you were given as a picture | Image | Main stage · Info cards · Action buttons |
QR Code is the better answer whenever you have a choice. It stays crisp however large the tile is, and changing where the code points is one field — nobody has to regenerate a picture and upload it again.
The picture path is for a code you cannot regenerate: a payment code, one issued by a bank or a landlord, one printed on something official.
Guest Wi-Fi, visitor registration, wayfinding and room control each have a tile of their own that builds the code for you — see The QR code tiles. This article is for a code Offision does not already know how to make.
2. Make room for it on the design
An action button is a 3:4 tile, and an info card is a 16:9 one. If the design has none, nothing in the preview will be clickable — so this is the first stop, not the last.
Open the content, then Layout in the rail, and give the design at least one button — Buttons carries a − N + stepper. If you are taking the picture path and want the code larger, turn on Cards instead.
Open Signage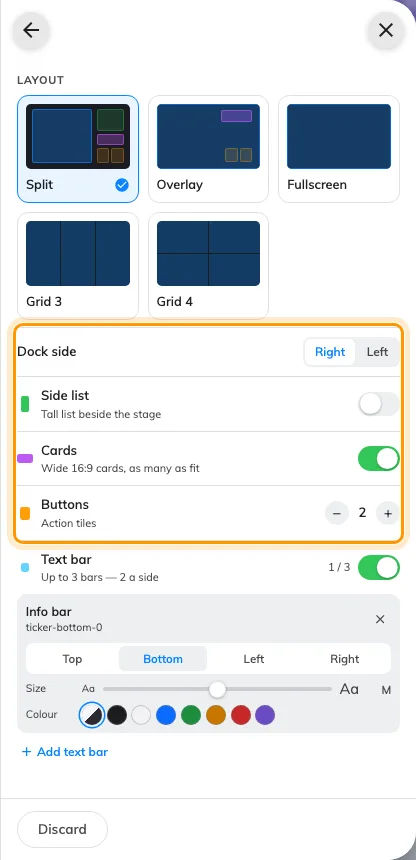
Buttons and Cards, the rows that decide whether there is anywhere to put a code.
Two things about this page surprise people, and both are covered in full in Change a layout:
- There is no Save button here. The ← arrow at the top applies the draft; Discard at the foot throws it away.
- In landscape you do not choose how many cards there are. Cards is a switch, and the count follows how wide the dock is — drag the seam and you get fewer, larger cards. Portrait gets a − N + stepper instead.
Go back with ←. The design redraws with the empty tiles in place.
3. Put a link on a button tile
Click the tile in the preview. That is the only way anything is selected in this editor — there is no list of slots in the rail. An empty tile opens the widget picker straight away; a tile that already holds something opens its settings instead, and the widget’s own row at the top of the rail opens the same picker.
Choose QR Code, under Ambient & info.
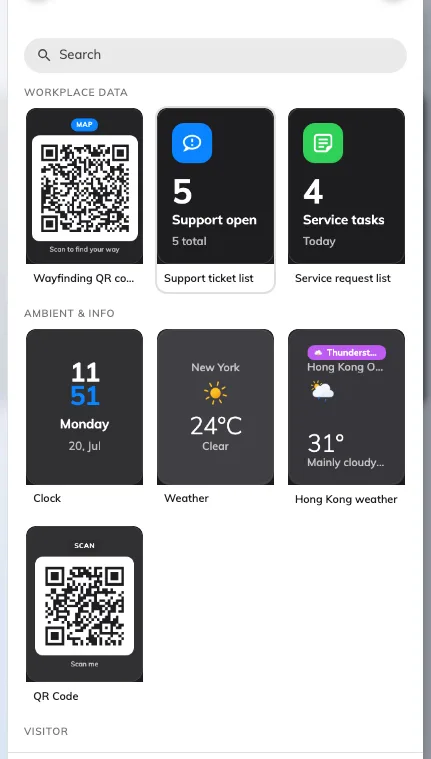
The picker, opened from an action tile. Picking assigns immediately.
Then fill the widget’s one setting, QR code content, with the link or the text you want scanned. The code is drawn on the spot, so the preview shows the real thing rather than a placeholder.
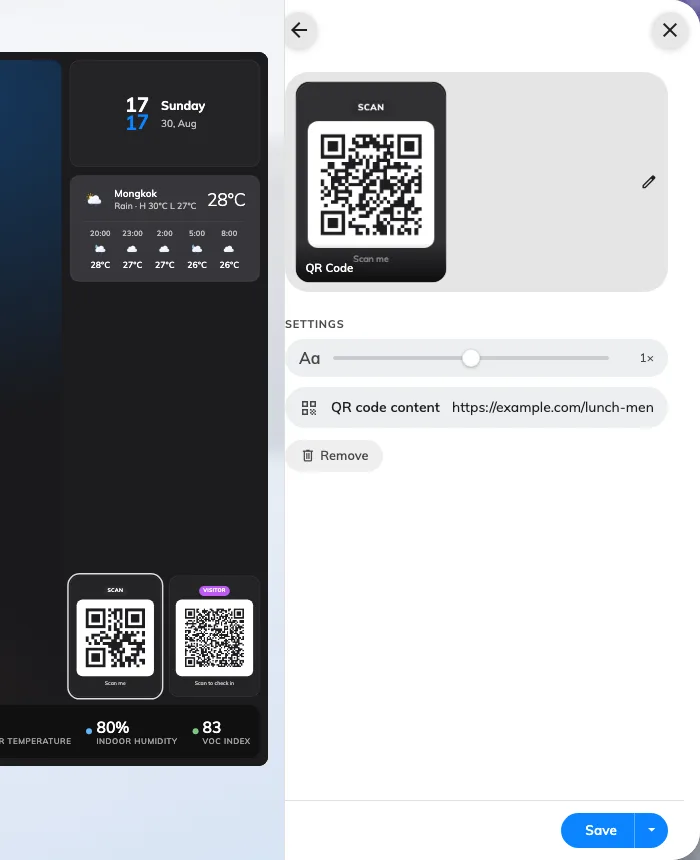
One field, and the tile beside it redrawing as you type.
The tile prints a Scan pill above the code and Scan me beneath it. Neither is editable — if the code needs a label of its own, put it in a text widget beside the tile.
4. Or show a code you were given as a picture
Take this path only for a code you cannot regenerate. Click the tile, card or main stage you want it on, choose Image, and open the Image row.
That row opens the file page, where the picture comes from:
- Recently used and Recently uploaded list what is already there, and Find more files… opens the full file browser.
- Upload from computer takes a new one, or you can drop a file anywhere on the page.
- It accepts PNG, JPEG, BMP, GIF and WebP, up to 500 MB.
- Under the row it says Suggested … px, measured from the exact spot this widget fills on this screen. Upload at that size and the picture is never scaled, which for a QR code is the difference between crisp and soft.
Uploads land in the signage media folder, which you can browse later at Signage › Uploaded media.
Then set Display mode to Fit to the space.
Everything else about this widget is in The Image widget.
5. Save, and scan it
Save at the foot of the rail. Saving is publishing — there is no separate publish step, and any screen already playing this content picks the change up within a few seconds.
Then scan the code off the screen, not off the preview in your browser. The preview proves the widget is configured; only the screen proves the whole chain — the save, the connection and the code itself.
If the code will not scan, it is nearly always one of three things: the picture is cropped (Display mode), the picture was uploaded far below the suggested size, or the tile is simply too small to hold that much data at a readable density — a long link needs a bigger tile than a short one.
What this does not control
- Where a QR Code widget may go. It is an action tile only. A code on the main stage, or in a 16:9 card, has to be an Image.
- A caption on the code. The QR Code tile’s Scan / Scan me wording is fixed, and the Image widget draws no caption at all.
- The other QR widgets. Wi-Fi QR Code, Visitor registration QR code, Wayfinding QR code and Room control QR code each build their own code from live data — a network, a rotating walk-in key, this screen’s own position, the booking currently in the room. None of them will ever show a code you supply. See Buttons and QR codes.
- Where the screen thinks it is. That is set on the device, not on the content, and it changes nothing about a code you typed in.