

Both maps
Add a building and its floors
Create the building your rooms and desks will sit in, then list its floors. The time zone comes from the map pin, not from a field. About five minutes.
1. Open Locations
Buildings and floors live under Directory, not under Booking.
Open Locations2. Fill in the building
Add opens an editor with its pages down the left: Basic, Floors and Information, plus Roles if your tenant assigns any. Everything in this step is on Basic.
Name takes one value per language your tenant has enabled. Fill in every one of them. A name left blank in Japanese falls back to English, so the building shows up in English inside an otherwise Japanese screen — which reads as a bug long before anyone thinks to look here.
Country or regions and Address are what they look like. Branch management appears only where branches are enabled, and it is the field that decides which administrators manage this building — see what a branch is, and what it scopes.
Access ID sits last, deliberately. It is the handle a spreadsheet uses to name this building on import — leave it blank if the building should not be importable, and note that it has to be unique across the tenant.
3. Drop the map pin
This is the step worth slowing down for. Under Location you place the building on a map, and underneath the map a line appears reading the time zone followed by Detected from the map location.
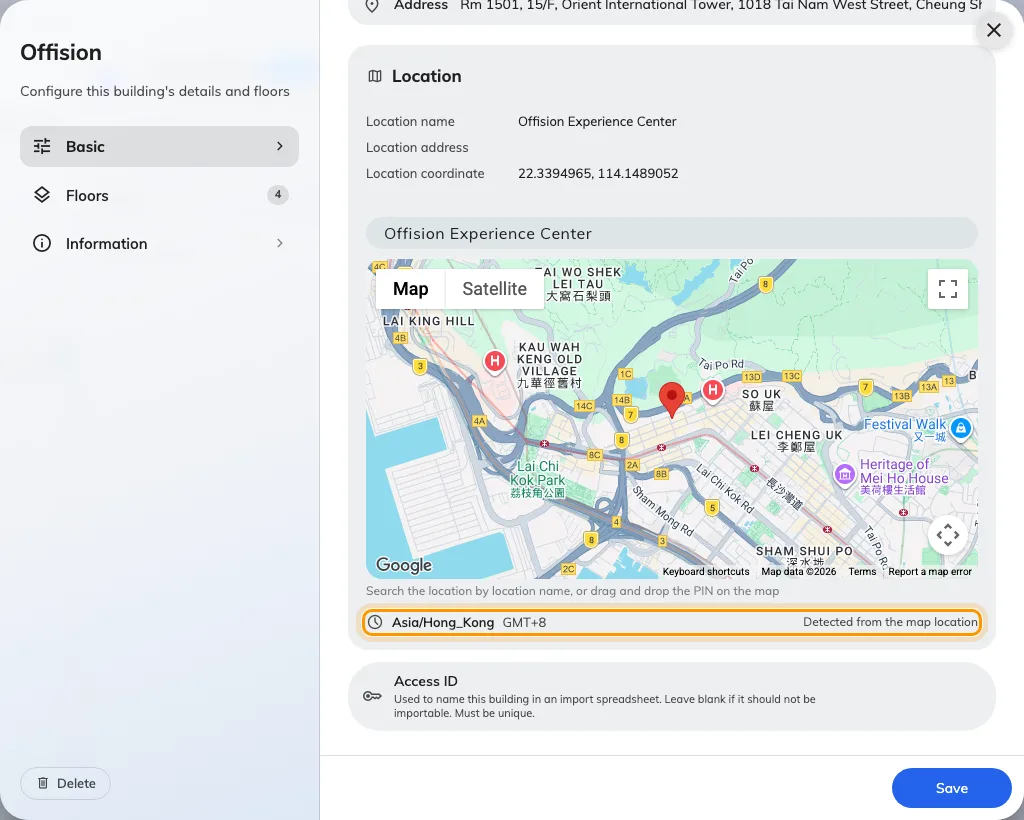
Under the map: the time zone the pin produced, and where it came from.
There is no time-zone field, and the read-only line is not a suggestion. It is the building’s actual time zone, worked out from where the pin is. Move the pin and it changes. Leave the pin off and the building has no time zone at all, and falls back to the system one.
So a building on the wrong side of a city border keeps working, but a building pinned in the wrong country quietly runs every booking in it on the wrong clock. Place the pin properly rather than approximately.
The time zone is not the only thing reading it — the pin is also the centre of the GPS check-in area and the link inside every booking and visitor email. What the block stores, and everywhere it ends up, is in what a building’s Google map location is used for.
4. List the floors
Open Floors. It is a single list — one row per floor, with the floor’s position on the left and its name on the right, and Add floor at the bottom.
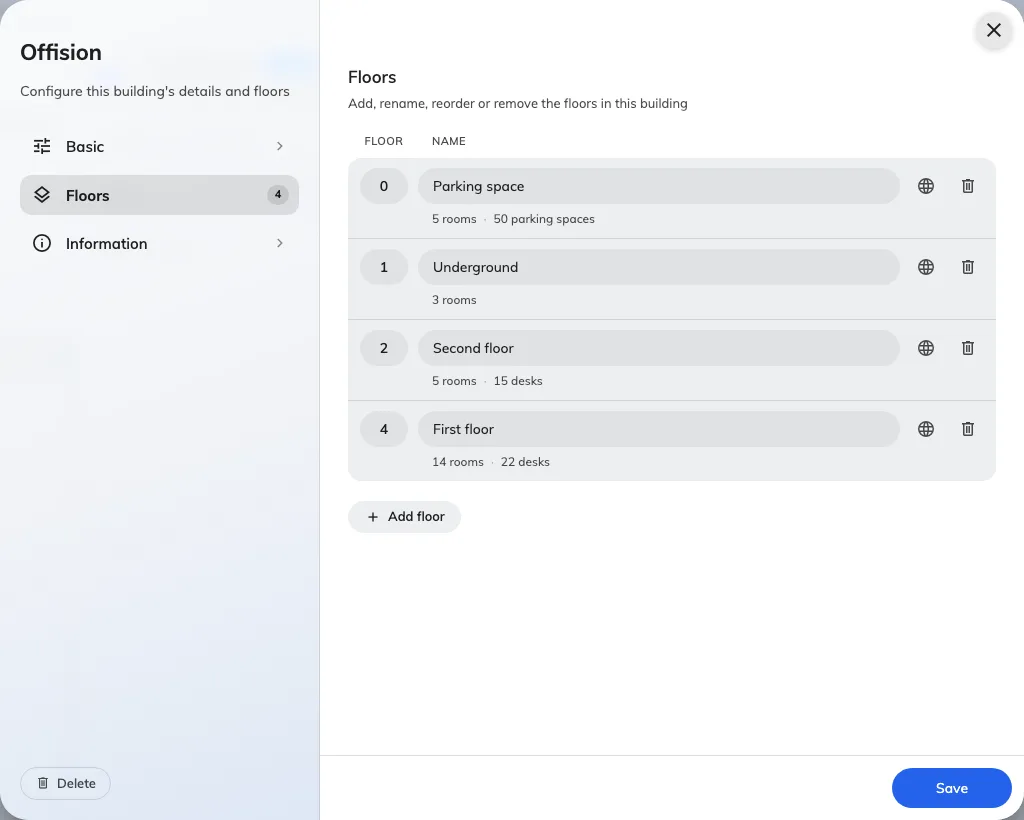
One row per floor: position on the left, name on the right.
Three things about that list are not visible on it:
- The number on the left is what orders the floor, not the name. Ground floor, 1/F, 2/F sort by the numbers you type, so a mezzanine or a basement goes where you number it rather than where it sorts alphabetically.
- Two floors may share a number, and the row says so — Shares order 3 with another floor. It is a warning, not an error, and it will save. Renumber anyway, or the two floors come back in an arbitrary order everywhere else.
- A row left blank is dropped when you save, rather than blocking the save. If you added three rows and only named two, you get two floors and no warning.
The globe button on a row opens the floor’s other languages — the same rule as the building name applies, and floor names are short enough that there is no excuse for skipping them.
Under each existing floor is a line saying what is on it — 14 rooms · 22 desks, or Nothing on this floor. Read it before deleting a floor: that is the only warning you get about what the floor is carrying.
Save when you are done. One save covers Basic and Floors together.
5. Check it worked
Go and add a room, or open one you already have, and look at its Location field. The new building should be offered there with its floors underneath it.
Open Standard RoomsIf the building appears but has no floors under it, the floor rows were blank when you saved.
What this does not cover
A floor plan is not a floor. The floors here are a list of names; the drawing people click on to find a room is made separately under Map — see Create a floor map with Map 2.0. A floor works perfectly well without one; you simply cannot place a resource on a picture until the picture exists.
The building’s time zone is not the system time zone, and which of the two applies depends on what you are looking at — see Which time zone applies.
Opening a second office is mostly not this page. Duplicating a building brings its address block, business hour and floor names across, and almost everything else was never stored in a site — see Open a second office by duplicating the first.