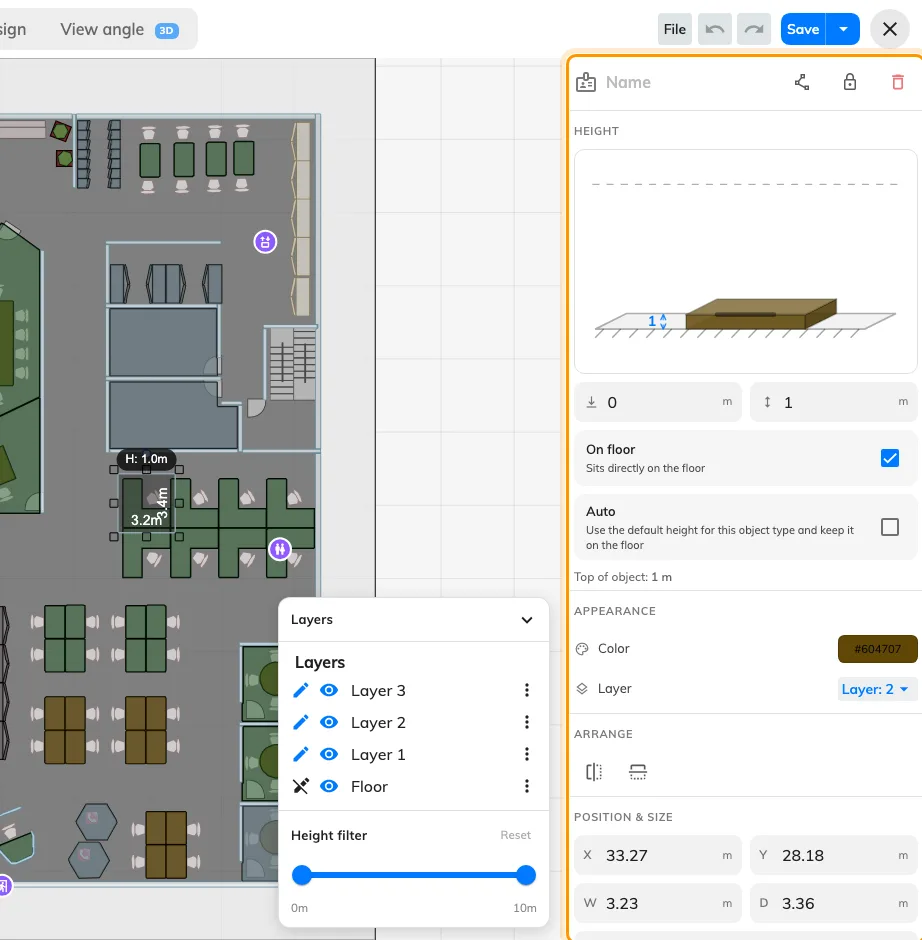
Edit a floor plan in the map editor, field by field — the header, the tool rail, the canvas switches, the layers panel and every box in the properties panel, grouped the way the screen groups them.
Everything the map editor can be told, in the order the screen puts it. For what
to do with any of it, start at
What an Offision map is made of.
The header
Control
What it does
When to use it
Design / Route / Assign / View angle
Switches which job you are doing. The drawing is the same in all four; the rail and the panel change
Design to draw, Route for walking paths, Assign to link rooms and desks, View angle to choose how the floor is drawn and to frame it
File → Import by image ( .png / .jpg)
Replaces the whole map from a picture, after warning you it overwrites
Starting again from a corrected plan. To change only the picture behind the drawing, use Update floor image instead
File → Import by floor plan data ( .ofp)
Replaces the whole map from an Offision map file
Copying a finished floor onto another floor, or into another tenant
File → Export Map (.ofp)
Downloads this floor as a map file
Before a big change, or to reuse the floor somewhere else. It is the only backup of a drawing there is
File → Contact us
Opens a request to Offision about this floor plan
When you would rather have the map drawn for you — it is a paid service
Undo / Redo
Steps back and forward through this session’s edits
Freely. Generating or clearing route paths counts as one step, so both are recoverable
Save
Writes the map, leaves the editor open
Often. Nothing reaches the server until you do
Save & Close (the arrow beside Save)
Writes and leaves
When you are finished
The tool rail — Design
Tool
What it does
When to use it
Select
Picks up a shape so the properties panel can edit it
The default. Return to it after drawing
Add rectangle
Draws a rectangle on the current layer
Rooms, walls, blocks. Most of a floor
Add ellipse
Draws an ellipse on the current layer
Round tables, planters, curved walls
Add workspace furniture
A catalogue of drawn objects in four groups — Room setting, Desk / Chair, Cupboard / Locker / Server rack, Shape
Anything recognisable. A drawn desk reads better in 3D than a rectangle, and comes with a sensible height
Update floor image
Swaps the picture behind the drawing, keeping everything drawn on it
A better scan of the same plan. Resize floor to fit image in that dialog matches the floor to the new picture
The first four are disabled while Floor is the layer being edited. That is
the layer of the slab itself, and nothing can be drawn on it.
The tool rail — the other modes
Mode
Rail
What it holds
Route
Draw, Move
Draw adds points and paths; Move repositions a point without redrawing it
Assign
One button per resource type — rooms, desks, equipment, parking spaces — plus Facility
Chooses which list the panel shows. It does not filter the map
View angle
View angle
An indicator, not a button. The projection, the tilt and the turn are all set from the panel on the right, and the mode tab carries a 3D or 2D badge saying which this floor is on
The canvas switches
In the menu behind the zoom percentage, bottom left. The three snapping switches
are saved with the map, so they are how the next person finds it.
Setting
What it does
When to change it
Zoom in / Zoom out
Steps the magnification
Freely. The zoom and position you leave are saved with the map, so the floor reopens where you left it
Zoom to fit
Frames the whole floor
After losing your place. The fastest way back
Zoom to 100%
Draws the floor at true scale
To judge whether an object is really the size you think
Zoom to selection
Frames what is selected
Working on one room of a large floor
Show grid
Draws a metre grid behind the plan
On, while drawing. Off, when judging how the floor looks
Snap to grid
New and moved shapes land on the grid
On, for a floor drawn from measurements
Snap to objects
Shapes align to what is already there
On, for rows of desks and walls that must meet
The layers panel
Four layers, fixed: Floor, Layer 1, Layer 2, Layer 3. They cannot
be added to or renamed.
Control
What it does
When to use it
Pencil
Makes that layer the one being edited — and only shapes on it can be selected
The first thing to check when a shape will not select
Eye
Hides the layer from view
To work on what is underneath. It hides nothing from anybody else
Layer menu
Import by image onto that layer, or Update floor image on the Floor layer
Tracing a second plan over the first
Height filter
Narrows the drawing to a band of heights, reporting how many objects are shown
Selecting furniture under waist height without catching the walls. Reset puts it back
The properties panel
Appears on the right when something is selected. With several selected it
applies to all of them, and a box whose values differ reads Mixed.
The panel fills the right-hand side whenever something is selected.
Header row
Field
What it does
When to change it
Name
Names the object
Always, for anything you will look for later. It is what identifies the shape in Assign mode
Edit points
Turns the shape into draggable points and edges
A room that is not a rectangle. Right-click an edge to add a point, a point to remove it, Esc to finish
Lock / Unlock
Stops the object being moved or resized
Once a wall is right. Unlock all is in the right-click menu
Delete
Removes the object
Removing the shape does not remove the room it was assigned to
Height
Field
What it does
When to change it
Side-on diagram
Shows the object between floor and ceiling, and can be dragged instead of typing
Judging a height by eye rather than by number
Elevation (left box)
How far the object’s base sits above the floor
Only for things that hang — a shelf, a wall-mounted screen
Height (right box)
How tall the object is
Walls to the real ceiling height, partitions around 1.2–1.5 m. Disabled while Auto is on
On floor
Pins the base to the floor — “Sits directly on the floor”
On for almost everything. Clear it to set an elevation
Auto
Uses the default height for that kind of object — “Use the default height for this object type and keep it on the floor”
Leave on for catalogue furniture; turn off for walls and anything unusual
Top of object
Elevation plus height — where the object actually ends
Read-only. Check it against your ceiling height
Appearance
Field
What it does
When to change it
Color
The object’s own colour on the map
To tell kinds of space apart at a glance. Availability colours are applied over this by whatever is drawing the map
Layer
Moves the object to another layer
Tidying a floor drawn on one layer — walls to 1, furniture to 2
Arrange
Field
What it does
When to change it
Flip horizontal / Flip vertical
Mirrors the object
A desk drawn facing the wrong way
Align left / center / right / top / middle / bottom
Lines several objects up on one edge. Two or more selected
Making a row of rooms share a wall line
Distribute horizontally / vertically
Spaces objects evenly. Three or more selected
A run of desks or parking bays
Position & size
All in metres or feet, and all typeable — usually faster and always more exact
than dragging.
Field
What it does
When to change it
X / Y
Where the object sits on the floor
Placing from measurements rather than by eye
W / D
Width and depth
Sizing a room off the plan you are tracing
Rotation
Turns the object, in degrees
A room at an angle to the building. Rotate rather than redraw
What this does not control
Which rooms exist. Rooms, desks, equipment and parking spaces are created
in Booking; the editor can open that form without leaving the screen, but it
does not own them.
Who can see or book anything. Nothing in this panel affects permissions or
availability.
What the map looks like on other screens. Labels, and which of them show,
are a display setting under UI customization. Availability colouring belongs to
the surface drawing the map.
The floor’s ceiling height. Heights are measured against it; it is not set
here.
edit floor plan in map editor. change a room on the map. map editor fields. map editor settings. floor plan editor fields. what does this button do. export ofp. zoom to fit. snap to objects. rotation. position and size. 平面図を編集する. マップ上の部屋を変更する. マップエディターの設定. フロアプランエディター 項目. ofp エクスポート. 表示倍率. このボタンは何. 編輯平面圖. 更改地圖上的房間. 地圖編輯器設定. 平面圖編輯器欄位. 匯出 ofp. 縮放至適合. 這個按鈕做什麼
Which Offision?
Pick the region your company is on. You can change it any time.